Showing posts with label CSE. Show all posts

Tuesday, 30 December 2014

introduction to dbms

INTRODUCTION TO DBMS 

What is DBMS?

Ans: The data base management system consists of a collection interrelated and persistent data are referred to as database. A set of application programs used to access, update and manage the data forms the DBMS. The goal of DBMS is to store data into database and retrieve data from database. It allows different user application programs to concurrently access the same database.

 What is different level of data abstraction?

Ans: There are three level data abstraction.

 Physical Level: The lowest level of abstraction describes how the data are actually stored. At the physical level, complex low-level data structures are described in details.

Logical Level: The next-higher level of abstraction describes what data are stored in the database, and what relationship exists among those data. The entire database is thus described in terms of small number of relatively simple picture structure. The user of the logical level does not need to be aware of the complexity.

View Level: A view level is a subset of database it may contain virtual data that is derived from a table (database) files but is not explicitly stored. 


Mention advantage of DBMS over file-processing system?

Ans: 
      • A database management system coordinates both physical and logical access to the data, where as a file processing system only coordinates the physical access.
      • A database management system (DBMS) is designed to coordinate multiple users accessing the same database at the same time whereas in file-processing system one program is allowed to access one data at a time.


how to speed internet

How to Increase Internet Speed

For user Windows XP Professional, you can increase extra Internet connection speed 20%. By default Windows XP hold 20% of your Internet speed for various service such as Windows Update and others.

If your Internet speed is slow you can to tweak Internet speed. By default, the Packet Scheduler of Windows XP Professional limits the system to 20 percent of the bandwidth of a connection, but you can use this setting to override the default. That packet is QOS (Quality of Service) for Windows XP. This packet may not be often used, so why don't we change the setting to tweak Internet Speed.

Determines the Percentage of connection bandwidth that the system can reserve. This value limits the combined bandwidth reservation of all programs running on the system. If you enable the setting, you can use the "Bandwidth Limit" box to adjust the amount of bandwidth the system can reserve. If you disable this setting or do not configure it, the system uses the default value of 20 percent of the connection. 

How to Increase Internet Speed? 


how to hide folder using command prompt

How to Hide Folder or Files Using Command Prompt

Trick to hide file and folder using command prompt, the most important thing is that, once hidden with this method, the files/folder cannot be viewed by any search options even if you click "Show All Hidden Files and Folders".

Hiding the most wanted files and folders is very important nowadays and it's really a tedious job too. In order to make this tedious job an easy one, I'm going to deliver you a the trick now.

Here I have taken a folder named "sms", when (+) operator was used the folder become hidden automatically and opposite was found when (-) operator was used.

For that your need to follow the following instructions 

    1. Press windowskey+R: Run command dialog box appears
    2. Now type "cmd" and hit enter. A command prompt windows displays.
    3. Now type "attrib +s +h F:\sms" and hit enter.
    4. The folder "collegephoto" will be hidden (Note: It cannot be viewed by any search options)
 
NOTE: To view this folder again, use the same command but replace '+' with '-' on both flags 's' and 'h'.
 

windows 8 shortcut keys

Windows 8 Shortcut Keyboard


Many of us now a day's using Windows 8 in their PC and finding difficulties to use the proper shortcuts in Windows 8. Most of the shortcut key remain same but some keys have been changed in new version of Windows 8.
 
WINDOWS 8 SHORTCUT KEYBOARD


how to speed up & faster pc

HOW TO SPEED UP COMPUTER

Many Computers take a lot of time to boot (or start). This is due to many reasons. One of them is given below

Some slight changes can do wonders for your system:

      1. Press start-> run then type "msconfig" and press enter

Go to the start up tab. Here you will see a list of start up items. These are all the programs that automatically start when you boot your PC. It is these that slow the boot up process.


So UN-check all the unwanted items like ms-office, messengers other utilities that you may not need at startup. Don't forget to UN-check your anti virus  Restart your PC and see yourself, Your PC will now boot faster.... 

how to install apache tomcat 6 | how to fix apache tomcat error

How to Install Apache tomcat 6 & how to fix Apache tomcat error easily

I tried to run JSP page in tomcat server but every time I failed I tried service.msc and tried to run Apache tomcat server again I have failed and I god this error code. To overcome this error and run the server I have searched lots of tutorial but none of them worked for me. The error code which I got while tried to run the server.

"Windows could not start the Apache Tomcat on Local Computer. For more information, review the system event Log. If this is a non-Microsoft service, contact the service vendor, and refer to service-specific error code 0"

Finally after a long try I run tomcat server.

I hope this tutorial will help you a lot. In this tutorial you do not need to set any Java home, Jdk home.

    • First thing you need to do is download the mentioned software from the link below

    • After downloading the software install Java and Tomcat in the same directory/folder 
 
 
How to Install Apache Tomcat 6?

    • Run Apache tomcat.exe file and click next 

    • select the "destination folder" as in the below image shown

    •  Now change port number (optional). You can set it to default:8080 

 Now browse and select JRE installation Path and click install, after installation click finish and run server


 Configuration Tomcat 6 to Run Properly:

go to Apache tomcat installation folder, then go to "bin" folder and execute "tomcat6.exe" and command window will open and do not close it else your server will be closed.


now you can check also whether tomcat server is running or not doing simply "services.msc" in Run command. Look, here you will find that Apache tomcat is not running. Don't be panicked, go to Internet explorer or any web browser and type -> http://localhost: [port number you have given during tomcat installation]/index.jsp


if every thing goes well you will be able to see this page. Now you can run any JSP page from Apache tomcat server.


Monday, 29 December 2014

java applet tutorial

Beginners guide in Java Applet Embedding a java applet in HTML page with Example

Modern days programming uses Java as an object oriented programming. Using applet we can use Java program embedded to any web program. Applet also provides data security and data encryption. If you are learning your first applet program then this tutorial is best for you.


Step 1: Write A Simple Applet Code in Java

It can be done in two ways:
    • Opening a notepad file in java bin directory and writing source code in it and save it with .java extension. Click here to know how to write a java program.
    • It can also be done from console window. I have used this path: c:\Programfiles\java\jdk1.7.0_06\bin\edit filename .java

Java Applet Sample Code:


 Step 2: Compile The Java Source Code

To compile the java file write the following code to console/command prompt c:\Programfiles\java\Jdk1.7.0_06\bin>javac first Applet .java after the compilation of the first Applet.java a first Applet.class file will be generated to your directory, i.e. a platform independent byte code you will get.

Step 3: Create a HTML Page That References Applet

Step 4: Display The Applet In HTML Page

Display the Applet can be done in two ways.

    • Open the created (i.e. firstApplet.html) html page with the browser 
    • Opening from the command prompt (console) c:\Programfiles\java\Jdk1.7.0_06\bin>applet viewer firstApplet.html 
Hope you have learn ed your first applet programming from this tutorial.


how to make business card:Photo shop

Photo shop Stylish Professional Business Card Tutorials 

Hi friends today. I am going to share with you an interesting topic. Today I am going to share with you how we can make stylish professional looking business card for yourself. Here in this tutorial I have used trial version of Adobe Photo shop CS6. You can download it free from Adobe's official website.


A business card basically contains business details of someones business. The front side contain the Company Name, company logo, company contact details and back side contain other business details. Here I will show you how to make the front side of the card. Business card is also a cheapest medium of advertising. The funny thing about business card is that the size is made such that so that you carry it in your wallet.

The ideal business card size is 3.5"/2" (width/height).

Business Card: Step 1
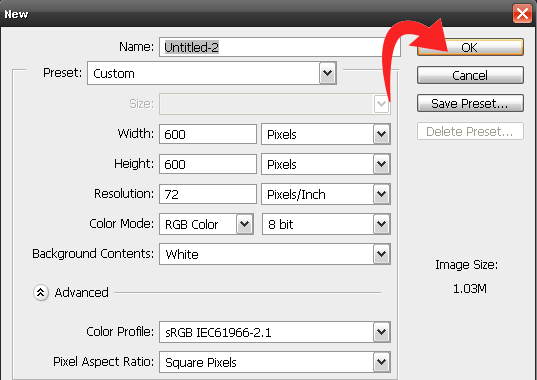
First create a new project. Press Ctrl+N to create a new project. Ideal document is size is 600/600 pixels.


Business Card: Step 2
Create a new layer and draw a rectangle using "Rectangle Tool". Fill the box with colour as shown in the picture. Now go to "Layer" menu option and select "Rasterize" type "Shape". This will remove extra hairline border from the rectangle box.

layer->Rasterize->Shape 


Business Card: Step 3
Now go to filter option and add noise to the rectangle (Filter->Noise>Add noise) and select noise distribution type as Gaussian.


Business Card: Step 4
Create another layer and create a rounded rectangle using "Rounded Rectangle Tool". Give it a colour of your own or try the colour as shown in card picture and perform Step 2 and Step 3.

Business Card: Step 5
Now add text to this card. You can add custom shape to your project using custom shape tool.

Business Card: Step 6
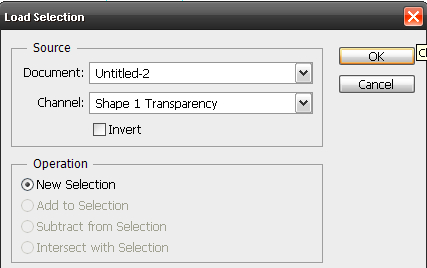
Now we will cut out text from the background or you can say impressing text on background. To do that first select the text layer and go to Select->Load Selection and Press OK. Now you see your text is highlighted. Now delete this text layer from delete layer option and again press Delete key from Keyboard. Now you get a cut out text.

Business Card: Step 7
Now you have to cut out shape from background rounded rectangle shape. To so this first right click on the shape layer and "Convert to smart object". Now go to select->Load Selection and Press OK. Now delete the shape layer from delete layer option and press delete key from keyboard.


Business Card: Step 8
Now select the rounded rectangle shape layer and add a layer style from blending option. Here you have to only used drop shadow option. Add drop shadow value as shown is picture.


Business Card: Step 9
Now select all layer except the background layer and merge them using link layer option. This will allow you to move your card above the background layer. If you want a transparent background card then just hide the background layer.

asp .net & c project list

ASP .NET & C PROJECT LIST

ASP .NET PROJECT LIST

  1. On-line Shopping Website.
  2. School Management Software.
  3. N.G.O. Website.
  4. E - Commerce Website.
  5. Coaching Management Software.
  6. Inventory System.
  7. Medical Store Manager.
  8. Payroll System.
  9. Tour & Travels Website.
  10. Book Publication Company Software.
  11. Computer Store Management System.
  12. Job Portal.
  13. Library Management System.
  14. On line Banking.
  15. Product Distributor Software.
  16. College Website.
  17. Dispensary Management System.
  18. Attendance Management System.
  19. Courier Management Service.
  20. E-Bazaar.
  21. Student Management System.

C PROJECT LIST

  1. Student Data Base System.
  2. Create a Video Game.
  3. A Calender Program.
  4. File and Directory Service System.
  5. Create a Anti Virus.

Sunday, 28 December 2014

computer science project list

Computer Science Project List


Computer Science Project General 

  1. HR Consultant.
  2. Internet Mailing Systems.
  3. Error Tracking Systems.
  4. Java Debugger.
  5. Multi-Tasking Sockets
  6. Re-ordering of packets using Retransmission Timer.
  7. Self-interested Routing in on-line Environments.
  8. Intruder Detection Systems. (Security Systems) 
  9. JD BC Database Interfacing Tools.
  10. On-line Education Systems.
  11. Cargo Management System.
  12. Net Banking.
  13. E - Wheel Software.
  14. E - Zest.
  15. Flow well Automation System.
  16. Digital Image Processing.
  17. Lending Tree Project.
  18. Secure Net Auction System
  19. Smart Card.
  20. Speed Age Courier System.
  21. Telecommunication System.
  22. Web-Based Library Management System.
  23. Multi User Chatting System
  24. Project Status Information System.
  25. E-Shopping.
  26. Share Trading System.
  27. Bud Trading.
  28. Query Builder.
  29. Marketing Administration System.
  30. Medical Agency.
  31. Railway Reservation.
  32. LIC Management.
  33. Graphical Library System.   
  34. Employee Info and Payroll System


how make website banner Jquery

Jquery floating image banner with close button tutorial


You must have seem some websites which contains some promotional banner poisoned at the bottom left corner of the web page or bottom right corner. You have also noticed that the banner also contain a close button to close banner. This type of banner is basically created using to images (1) Banner image (2) Close image. To make things possible like way we want we have to use J-QUERY.


So in this tutorial I have used J QUERY to make this code as light as possible. As you know the definition of J QUERY is "write less do more". I have also tried to write the code as little as possible.

You can use this type of banner in your website to display offers to your website visitors or you can promote any page.

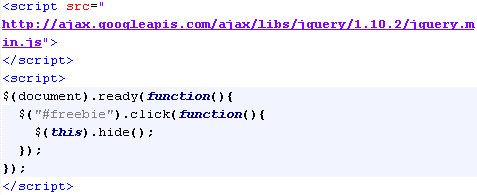
Write the following script code  inside head tag of your HTML page.


Write the following code inside body section of your HTML page. 


Do not use this code for commercial purpose. If you want to use this code for commercial purpose then buy a license from AFS.