Tuesday 30 December 2014

digital multiplexing

DIGITAL MULTIPLEXING

Multiplexing is a technique in which several massage signals are combined into a composite signals for transmitting over a common channel. In order to transmit a number of this signals over the same channel, the signals must be kept apart so that they do not interfere with each other, and hence they can be separated at the receiver end.

Basically multiplexing is two types as under:

1. Frequency division multiplexing (FDM)

2. Time division multiplexing (TDM)

Frequency division multiplexing (FDM): This technique permits a fixed frequency band to every user in the complete channel bandwidth. Such frequency slot is allotted contentiously to that user. As an example consider the channel bandwidth is 1Mhz. Let there be 10 user, each requiring up to 100KHz bandwidth. So each user will get 1000KHz bandwidth. This techniques is known as frequency division multiplexing (FDM). It is basically used for modulated signals. This is due to the fact that a modulated signal can be placed in any frequency band by just changing the carrier frequency. 

Time division multiplexing: In TDM the signal to be multiplexed are transmitted sequentially one after other. Each signal occupies a short time slot. Thus, the signals are isolated from each other in time domain, but all of them occupy the same slot in the frequency spectrum, therefore the complete bandwidth of the communication channel is available to each signal to be transmitted in TDM.


introduction to dbms

INTRODUCTION TO DBMS 

What is DBMS?

Ans: The data base management system consists of a collection interrelated and persistent data are referred to as database. A set of application programs used to access, update and manage the data forms the DBMS. The goal of DBMS is to store data into database and retrieve data from database. It allows different user application programs to concurrently access the same database.

 What is different level of data abstraction?

Ans: There are three level data abstraction.

 Physical Level: The lowest level of abstraction describes how the data are actually stored. At the physical level, complex low-level data structures are described in details.

Logical Level: The next-higher level of abstraction describes what data are stored in the database, and what relationship exists among those data. The entire database is thus described in terms of small number of relatively simple picture structure. The user of the logical level does not need to be aware of the complexity.

View Level: A view level is a subset of database it may contain virtual data that is derived from a table (database) files but is not explicitly stored. 


Mention advantage of DBMS over file-processing system?

Ans: 
      • A database management system coordinates both physical and logical access to the data, where as a file processing system only coordinates the physical access.
      • A database management system (DBMS) is designed to coordinate multiple users accessing the same database at the same time whereas in file-processing system one program is allowed to access one data at a time.


how to speed internet

How to Increase Internet Speed

For user Windows XP Professional, you can increase extra Internet connection speed 20%. By default Windows XP hold 20% of your Internet speed for various service such as Windows Update and others.

If your Internet speed is slow you can to tweak Internet speed. By default, the Packet Scheduler of Windows XP Professional limits the system to 20 percent of the bandwidth of a connection, but you can use this setting to override the default. That packet is QOS (Quality of Service) for Windows XP. This packet may not be often used, so why don't we change the setting to tweak Internet Speed.

Determines the Percentage of connection bandwidth that the system can reserve. This value limits the combined bandwidth reservation of all programs running on the system. If you enable the setting, you can use the "Bandwidth Limit" box to adjust the amount of bandwidth the system can reserve. If you disable this setting or do not configure it, the system uses the default value of 20 percent of the connection. 

How to Increase Internet Speed? 


how to hide folder using command prompt

How to Hide Folder or Files Using Command Prompt

Trick to hide file and folder using command prompt, the most important thing is that, once hidden with this method, the files/folder cannot be viewed by any search options even if you click "Show All Hidden Files and Folders".

Hiding the most wanted files and folders is very important nowadays and it's really a tedious job too. In order to make this tedious job an easy one, I'm going to deliver you a the trick now.

Here I have taken a folder named "sms", when (+) operator was used the folder become hidden automatically and opposite was found when (-) operator was used.

For that your need to follow the following instructions 

    1. Press windowskey+R: Run command dialog box appears
    2. Now type "cmd" and hit enter. A command prompt windows displays.
    3. Now type "attrib +s +h F:\sms" and hit enter.
    4. The folder "collegephoto" will be hidden (Note: It cannot be viewed by any search options)
 
NOTE: To view this folder again, use the same command but replace '+' with '-' on both flags 's' and 'h'.
 

windows 8 shortcut keys

Windows 8 Shortcut Keyboard


Many of us now a day's using Windows 8 in their PC and finding difficulties to use the proper shortcuts in Windows 8. Most of the shortcut key remain same but some keys have been changed in new version of Windows 8.
 
WINDOWS 8 SHORTCUT KEYBOARD


how to speed up & faster pc

HOW TO SPEED UP COMPUTER

Many Computers take a lot of time to boot (or start). This is due to many reasons. One of them is given below

Some slight changes can do wonders for your system:

      1. Press start-> run then type "msconfig" and press enter

Go to the start up tab. Here you will see a list of start up items. These are all the programs that automatically start when you boot your PC. It is these that slow the boot up process.


So UN-check all the unwanted items like ms-office, messengers other utilities that you may not need at startup. Don't forget to UN-check your anti virus  Restart your PC and see yourself, Your PC will now boot faster.... 

how to install apache tomcat 6 | how to fix apache tomcat error

How to Install Apache tomcat 6 & how to fix Apache tomcat error easily

I tried to run JSP page in tomcat server but every time I failed I tried service.msc and tried to run Apache tomcat server again I have failed and I god this error code. To overcome this error and run the server I have searched lots of tutorial but none of them worked for me. The error code which I got while tried to run the server.

"Windows could not start the Apache Tomcat on Local Computer. For more information, review the system event Log. If this is a non-Microsoft service, contact the service vendor, and refer to service-specific error code 0"

Finally after a long try I run tomcat server.

I hope this tutorial will help you a lot. In this tutorial you do not need to set any Java home, Jdk home.

    • First thing you need to do is download the mentioned software from the link below

    • After downloading the software install Java and Tomcat in the same directory/folder 
 
 
How to Install Apache Tomcat 6?

    • Run Apache tomcat.exe file and click next 

    • select the "destination folder" as in the below image shown

    •  Now change port number (optional). You can set it to default:8080 

 Now browse and select JRE installation Path and click install, after installation click finish and run server


 Configuration Tomcat 6 to Run Properly:

go to Apache tomcat installation folder, then go to "bin" folder and execute "tomcat6.exe" and command window will open and do not close it else your server will be closed.


now you can check also whether tomcat server is running or not doing simply "services.msc" in Run command. Look, here you will find that Apache tomcat is not running. Don't be panicked, go to Internet explorer or any web browser and type -> http://localhost: [port number you have given during tomcat installation]/index.jsp


if every thing goes well you will be able to see this page. Now you can run any JSP page from Apache tomcat server.


super heterodyne AM receiver

Super heterodyne AM receivers


Super heterodyne AM receivers: On Pic.4.1 you can see the block diagram of a radio-broadcast super heterodyne receive. The circuit (UK) refines the signal of the turned station from all the voltages created in the antenna (A) by various radio transmitters and sources of disturbances. In our example, it's an AM signal that has the carrier frequency F's, and is modulated by a single tone, as seen in the rectangle above its label. This signal is being led into the stage called the mixer. Another voltage is also led into it, the voltage from the local oscillator that has the frequency of f0, and a constant amplitude. Under the effect of these two signals, the phenomenon called the outbreak takes place in the mixer, and an AM signal appears on its output, its frequency being fm=455kHz. This signal called the inter-frequency (IF) signal, and its frequency fm the infrequency. The IF signal has the same envelope as the station signal entering the mixer. That means, that the information from the transmitter to the mixer is carried by the signal frequency F's, and in the mixer it is being assumed by a new carrier, that the frequency fm. When transferring to another station, the user changes the capacitance of the variable input circuit to be equal to that stations one. Another variable capacitor, Co, is located on the same shaft as C, so its capacitance changes simultaneously to that of C. This capacitor is located in the local oscillator and that is how it gets new oscillating frequency, having such value that the difference of the oscillator and station frequency is again equal to the inter-frequency value.

Here's one numerical example. The inter frequency is being adopted by the constructor of the device, and it is mostly fm=455 kHz. When the receiver is set to the station that has the frequency of fm=684 kHz, the frequency of the local oscillator shall be fO=1139 kHz, therefore making there difference be 1139 kHz-684 kHz=455 kHz=fm. 

When tuning to a station that operates on the frequency of fS=1008 kHz, the listener will change the capacitance's of the two capacitor until the resonant frequency of the input circuit becomes fS=1008 kHz, and the oscillator frequency fO=1463 kHz, therefore yielding 
1463 kHz-1008 kHz=455 kHz=fm.

If the receiver has more wavebands (LW, MW, SW1, SW2...) it is being contracted to have same inter-frequency value for all of them.

What do we gain with this change of the carrier frequency? So far we haven't mentioned one very important thing, that is that the input circuit can never be selective enough, to extrapolate only the signal of the tuned station, from all the signals that exist in the antenna. On the output of the circuit, besides the station signal, also signal of strong and local transmitters are obtained, epically the signals from the neigh boring channels (their frequency being very close to the one of the station). All these signals are receiving new signal carriers in the mixing stage, with their frequencies deviating fm as much as their carrying frequencies differ from fS. E.g., if the input circuit is set on the station whose frequency is 1008 kHz, another two signal from the neigh boring channels can also emerge on its exit.


Their frequencies would be 999 kHz and 1017 kHz. The ordinary TFR receiver would in this case be totally incapable of suppressing those signal, which is not the case with the super heterodyne receiver. These 3 signals are entering the mixer, which gets the 1463 kHz voltage from the oscillator. The outbreak occurs, and 3 AM signals are exiting the stage, their frequencies being 455 kHz and kHz. All 3 signals go to the IF amplifier (MFP), which has several amplifying stages with oscillatory circuits set 455 kHz, making it very selective, so it amplifies only the 455 kHz signal and suppresses the other enough not to disturb reception.

The signal exiting the IF amplifier is led onto the detector (Det.), the LF voltage amplifier (NFP) and the output stage (IS), the circuits we spoke about in the previous projects.

The ARP signifies the circuit that turns back the DC component of the detected signal into the IF amplifier, to obtain the automatic amplification regulation. Above every block on the picture you can see the signal shape exiting that block, as seen on the oscilloscope, in case the modulation in the transmitter is done by the single, sinusoidally-shaped tone. The upper part of the picture contains the average voltage amplifications for each block, for the mass-production devices. Total voltage amplification, which is the ratio of the voltage on the loudspeaker to the voltage in the antenna is A=750000. The amplification in decibels is therefore:

A(dB)=20logA=117.5
The Simplest Super heterodyne AM Receiver   

The author presume that most of the reader, especially those just entering the world of radio with this book, are somewhat scared by the block diagram from pic.4.1. Their question probably is: Can an amateur build such a received? Yes, he can. The author has a friend that succeeded in this some 40 years ago, when all had been done with the electronic tubes, making the practical realisation of a receiver much harder than it is today, with semiconductors (its radio amateur call sign is YT1FA, and those who doubt it may contact him). However, he was doing this in the premises of YU1EXY Radio Club, in the attic of the Elector technical Faculty in Belgrade, using the club (more less trophy) instruments ans more important, he had help of Sasa Piosijan, Radivoje Karakasevic and Kiro Stojcevski, who knew all about the radios, especially Sasa

The main problem in making a super hetero dyne device is not the circuit complexity but its setup, which requires lot of practical experience and some special instruments, that our readers probably don't possess. But they are much better than the TRF receiver, both regarding the sensitivity and selectivity, so we made simpler that are simple to set, with no instruments necessary, block diagram and main features are given on Pic.4.2-a&b.

This IC comprises the critical stages of an AM super hetero dyne receiver, the mixer and local oscillator. The station signal is led either on picture 1 or on pin 2 (or on both of them, in case of symmetrical coupling with the previous stage), and the IF signal is obtained on the pin 4 or 5 (or on both of them, in case of symmetrical coupling with the next stage). An oscillatory circuit, that determines the frequency of the local oscillator and the positive feedback circuit are connected between the pins No.6 and 7. pin 3 is connected go Gnd, i.e. the minus pole of the DC supply voltage. pin 8 receives a positive DC supply voltage which can, acc. to the table given on picture 4.2, vary between 4.5 V to 8 V. The value of this voltage is not critical, but it is extremely important for normal operation of the receiver that this voltage is stable, therefore urging for it to be separately stabilised (with special care), as seen in some projects in this chapter and in the Appendix, that involve the NE612. In the next that follow 3 simple super hetero dyne receivers made with NE612 will be describe.


Monday 29 December 2014

plotting functions in matlab


Plotting Functions in MATLAB

MATLAB has build in function that allow one to generate x-y polar, contour and three-dimensional plots and bar charts. MATLAB also allow one to give title to graph, label the x and y axis, and a grid to graph. In addition, there are commands for controlling the screen and scaling.
X-Y Plot and annotations:
The Plot command generates a linear-y plot. This command has three variations.
Plot(x) 
Plot(x,y)
Plot (x1,y1,x2,y2,x3,y3,....Xn,Yn,)
If x is a vector, the command PLOT(x) is used.
if x and y are vector of the same length, then the command plot(x,y) is used.
Plot(x1,y1,x2,y2,x3,y3,.....Xn,Yn) is used for multiple arguments.
To write text on a graphic screen beginning at a point (x,y) on the graphic screen, one can use command text(x,y, 'any text')

Example:
t=0:0.25:7;
y =sin(t);
plot(t,y)

 
Example: Response of an RC Circuit:

Solution:
MATLAB Script

T=0:0.5:4;
Y=6*ept(-2*t);
Plot(t,y);
Title('Response of an RC Circuit:')
Xlabel(' Time in seconds')
Ylabel('Voltage in volts')
Grid 

Voltage and current of an RL Circuit:
For an RL Circuit, the voltage v(t) and current i(t) are given as:
V(t)=10cos(377t)
I(t)=5cos(377t+60o)

Solution: 
MATLAB Script


introduction to matlab

Introduction to MAT LAB

What is MAT LAB?

MAT LAB is basically a high level language which has many specialisation toolboxes for making things easier for us.


What are we interested in?

The features we are going to require is vast number.


MAT LAB SCREEN:


java applet tutorial

Beginners guide in Java Applet Embedding a java applet in HTML page with Example

Modern days programming uses Java as an object oriented programming. Using applet we can use Java program embedded to any web program. Applet also provides data security and data encryption. If you are learning your first applet program then this tutorial is best for you.


Step 1: Write A Simple Applet Code in Java

It can be done in two ways:
    • Opening a notepad file in java bin directory and writing source code in it and save it with .java extension. Click here to know how to write a java program.
    • It can also be done from console window. I have used this path: c:\Programfiles\java\jdk1.7.0_06\bin\edit filename .java

Java Applet Sample Code:


 Step 2: Compile The Java Source Code

To compile the java file write the following code to console/command prompt c:\Programfiles\java\Jdk1.7.0_06\bin>javac first Applet .java after the compilation of the first Applet.java a first Applet.class file will be generated to your directory, i.e. a platform independent byte code you will get.

Step 3: Create a HTML Page That References Applet

Step 4: Display The Applet In HTML Page

Display the Applet can be done in two ways.

    • Open the created (i.e. firstApplet.html) html page with the browser 
    • Opening from the command prompt (console) c:\Programfiles\java\Jdk1.7.0_06\bin>applet viewer firstApplet.html 
Hope you have learn ed your first applet programming from this tutorial.


ECE PROJECT LIST

Electronics & Communication Engineering Project List 


1. DIGITAL COMBINATION LOCK

2. SAFETY GUARD FOR THE BLIND

3. LIGHT CONTROLLED DIGITAL FAN REGULATOR

4. LOW-COST ENERGY METER USING ADE 7757

5.  HOME AUTOMATION AND SECURITY CONTROL INTERFACE 

6. LINE TRACKING ROBOT MOUSE

7. REMOTE CONTROLLED STEPPER MOTOR

8. ULTRASONIC SWITCH

9. DEVICE SWITCHING USING PASSWORD

10. SPEED CHECKER FOR HIGHWAYS

11. ULTRASONIC PROXIMITY DETECTOR

12. ULTRASONIC MOVEMENT DETECTOR

13. VEHICLE SPEED MEASUREMENT CONTROL PC BASED

14. SMART CARD FOR ENTRY EMPLOYEE

15. SECURITY ACCESS CONTROL SYSTEM

16. RADAR SYSTEM

17. PREPAID CAR PARKING SYSTEM

18. PREPAID ENERGY METER

19. ULTRASONIC DISTANCE METER

20. DATA SECURITY SYSTEM

21. DESIGN OF A BUS STATUS IDENTIFICATION SYSTEM

22. CALLING NUMBER IDENTIFICATION USING CALCULATOR

23. OPTICAL REMOTE SWITCH

24. LOAD PROTECTOR WITH REMOTE SWITCHING

25. DIGITAL WEIGHT ACCUMULATOR

26. REMOTE CONTROLLED LAND ROVER

27. TELEPHONE ANSWERING MATCHING

28. AUTO CAR PARKING

29. INTELLIGENT AMBULANCE CAR WHICH CONTROL TO TRAFFIC ROBOT

30. WATCHMAN ROBOT

31. SUN SEEKER

32. AUTO BRAKING SYSTEM

33. TOUCH SCREEN

34. DTMF REMOTE CONTROL SYSTEM

35. AUTOMATIC SECURITY SYSTEM SENDING MESSAGE ON OUR CELL

36. FASTED FINGER FIRST

37. MOBILE CONTROL ELECTRICAL APPLIANCES

38. RF CONTROL ELECTRICAL APPLIANCES

39. MIND READER

40. DIGITAL COMBINATION LOCK

41. SAFETY GUARD FOR THE BLIND

42. DIGITAL SPEEDOMETER

43. MICRO PROCESSOR-BASED DC MOTOR SPEED CONTROL

44. RADIO CONTROLLED REMOTE CONTROL

45. 31/2 DIGIT VOLTMETER WITH LEC

46. 31/2 DIGIT VOLTMETER WITH LCD

47. 31/2 DIGIT THERMOMETER

48. DTMF 5-CHANNEL SWITCHING VIA POWER LINE 

49. DEVICE SWITCHING USING PASSWORD 

50. LASER BASED COMMUNICATION LINK

project list for electrical engineering

ELECTRICAL PROJECT LIST

1. Mobile technology (GSM) based remote monitoring and control of digital energy meter. Useful for electricity department personal for remote meter reading. Also useful to disconnect to power supply to consumer in case of non-payment of electric bill. This is also used to exchange message like power cut timings with the consumers.

2. Controlling AC lamp Dimmer through Mobile Phone (IEEE-2010).

3. Multiple Transformer oil temperature monitoring with automatic circuit breaker operation with SMS based alerts.

4. A Novel Wireless Self-powered Micro controller-based monitoring circuit for photo voltaic panels in grid-connected systems (IEEE-2010).

5. Wireless energy meter reading on hand-help device based on RF Transceiver.

6. SCADA implementation based on wireless RF technology. (IEEE-2009)

7. Motor speed monitoring and control system using GSM modem. 

8. A Smart card business prepaid electricity system.

9. High voltage fuse blown indicator with voice based management.

10. Voice enabled devices switching for visually impaired.

11. Industrial power grid electrical parameter data acquisition system through wireless technology.

12. DC Motors speed synchronisation for rolling mills.

13. Touch screen based digital devices control system.

14. Construction of central control unit for irrigation water pump.

15. Wireless energy meter monitoring system with automatic tariff calculation.

16. Home network configuration scheme for all electric appliances using zigbee based integrated remote controller.

17. Resistive touch screen controlled contact less speed monitoring and controlling of dc motor with speed limit alerts.

18. DC motor speed and direction control over GSM Mobile/Modem.

19. Smart wireless temperature data logger (IEEE-2007)

20. Energy meter monitoring and control system using SMS technology (IEEE-2007).
 

how to make business card:Photo shop

Photo shop Stylish Professional Business Card Tutorials 

Hi friends today. I am going to share with you an interesting topic. Today I am going to share with you how we can make stylish professional looking business card for yourself. Here in this tutorial I have used trial version of Adobe Photo shop CS6. You can download it free from Adobe's official website.


A business card basically contains business details of someones business. The front side contain the Company Name, company logo, company contact details and back side contain other business details. Here I will show you how to make the front side of the card. Business card is also a cheapest medium of advertising. The funny thing about business card is that the size is made such that so that you carry it in your wallet.

The ideal business card size is 3.5"/2" (width/height).

Business Card: Step 1
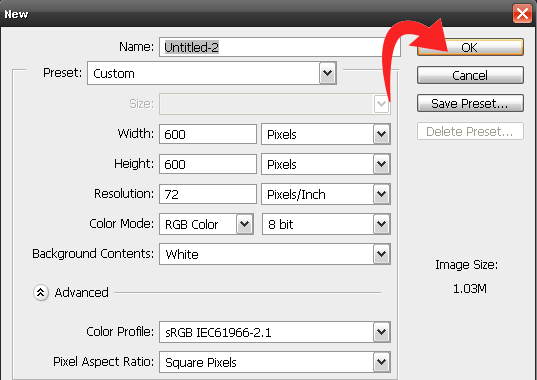
First create a new project. Press Ctrl+N to create a new project. Ideal document is size is 600/600 pixels.


Business Card: Step 2
Create a new layer and draw a rectangle using "Rectangle Tool". Fill the box with colour as shown in the picture. Now go to "Layer" menu option and select "Rasterize" type "Shape". This will remove extra hairline border from the rectangle box.

layer->Rasterize->Shape 


Business Card: Step 3
Now go to filter option and add noise to the rectangle (Filter->Noise>Add noise) and select noise distribution type as Gaussian.


Business Card: Step 4
Create another layer and create a rounded rectangle using "Rounded Rectangle Tool". Give it a colour of your own or try the colour as shown in card picture and perform Step 2 and Step 3.

Business Card: Step 5
Now add text to this card. You can add custom shape to your project using custom shape tool.

Business Card: Step 6
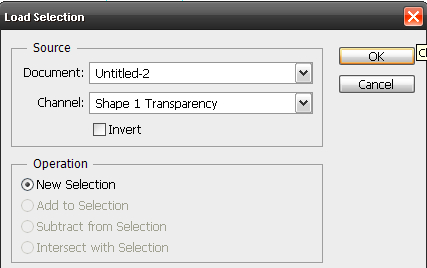
Now we will cut out text from the background or you can say impressing text on background. To do that first select the text layer and go to Select->Load Selection and Press OK. Now you see your text is highlighted. Now delete this text layer from delete layer option and again press Delete key from Keyboard. Now you get a cut out text.

Business Card: Step 7
Now you have to cut out shape from background rounded rectangle shape. To so this first right click on the shape layer and "Convert to smart object". Now go to select->Load Selection and Press OK. Now delete the shape layer from delete layer option and press delete key from keyboard.


Business Card: Step 8
Now select the rounded rectangle shape layer and add a layer style from blending option. Here you have to only used drop shadow option. Add drop shadow value as shown is picture.


Business Card: Step 9
Now select all layer except the background layer and merge them using link layer option. This will allow you to move your card above the background layer. If you want a transparent background card then just hide the background layer.

asp .net & c project list

ASP .NET & C PROJECT LIST

ASP .NET PROJECT LIST

  1. On-line Shopping Website.
  2. School Management Software.
  3. N.G.O. Website.
  4. E - Commerce Website.
  5. Coaching Management Software.
  6. Inventory System.
  7. Medical Store Manager.
  8. Payroll System.
  9. Tour & Travels Website.
  10. Book Publication Company Software.
  11. Computer Store Management System.
  12. Job Portal.
  13. Library Management System.
  14. On line Banking.
  15. Product Distributor Software.
  16. College Website.
  17. Dispensary Management System.
  18. Attendance Management System.
  19. Courier Management Service.
  20. E-Bazaar.
  21. Student Management System.

C PROJECT LIST

  1. Student Data Base System.
  2. Create a Video Game.
  3. A Calender Program.
  4. File and Directory Service System.
  5. Create a Anti Virus.

Sunday 28 December 2014

computer science project list

Computer Science Project List


Computer Science Project General 

  1. HR Consultant.
  2. Internet Mailing Systems.
  3. Error Tracking Systems.
  4. Java Debugger.
  5. Multi-Tasking Sockets
  6. Re-ordering of packets using Retransmission Timer.
  7. Self-interested Routing in on-line Environments.
  8. Intruder Detection Systems. (Security Systems) 
  9. JD BC Database Interfacing Tools.
  10. On-line Education Systems.
  11. Cargo Management System.
  12. Net Banking.
  13. E - Wheel Software.
  14. E - Zest.
  15. Flow well Automation System.
  16. Digital Image Processing.
  17. Lending Tree Project.
  18. Secure Net Auction System
  19. Smart Card.
  20. Speed Age Courier System.
  21. Telecommunication System.
  22. Web-Based Library Management System.
  23. Multi User Chatting System
  24. Project Status Information System.
  25. E-Shopping.
  26. Share Trading System.
  27. Bud Trading.
  28. Query Builder.
  29. Marketing Administration System.
  30. Medical Agency.
  31. Railway Reservation.
  32. LIC Management.
  33. Graphical Library System.   
  34. Employee Info and Payroll System


how make website banner Jquery

Jquery floating image banner with close button tutorial


You must have seem some websites which contains some promotional banner poisoned at the bottom left corner of the web page or bottom right corner. You have also noticed that the banner also contain a close button to close banner. This type of banner is basically created using to images (1) Banner image (2) Close image. To make things possible like way we want we have to use J-QUERY.


So in this tutorial I have used J QUERY to make this code as light as possible. As you know the definition of J QUERY is "write less do more". I have also tried to write the code as little as possible.

You can use this type of banner in your website to display offers to your website visitors or you can promote any page.

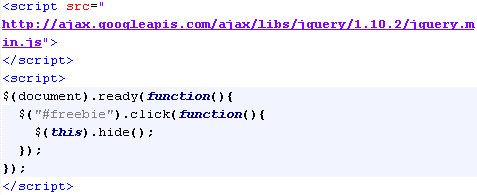
Write the following script code  inside head tag of your HTML page.


Write the following code inside body section of your HTML page. 


Do not use this code for commercial purpose. If you want to use this code for commercial purpose then buy a license from AFS. 


Wandoo Planet

Wandoo Planet


It took me quite a while to get through my backlog a pod casts, so i just listened to a grate episode from Chris bugs of the A.T. Tips cast. Episode 132 featured an interview with a former educator spreading the word about wandoo planet. Wandoo Planet is a recommendation engine for children, think Pandora or Netflix. Basically, kids pick some of the favourite interests, via a fun game, and the website suggests books and movies for them to check out. The goal is to help students find books in their interest and get them reading more, which as we all know, is one of the best ways to increase students ability to read!

I took a few minutes and tried it out myself, and have to say it's fun. The is a great way to get children thinking about their interests. Some students may need to have the interests read to them, and a suggestion to make it more accessible might to be include pictures or text to speech for the interests. It looks like a fun way to engage students and get them reading!    

Saturday 27 December 2014

how to improve your english communication skills better


 6 Way to Immediately Improve Your English Communication Skills and Make it Powerful Using the Simple Tips.

In this articles, I would like to give you a few tips to help you overcome the difficulties you might be experiencing. Simplest ways to improve your English communication skills.

 SLOW DOWN YOUR SPEAKING SPEED  


1. SLOW DOWN YOUR SPEAKING SPEED: You might be an eloquent speaker when it comes to your mother tongue, but expecting the same standards from yourself when speaking in a foreign language may not be very realistic.

Especially, if you're at the early stages of learning. Learners are often not to worry about the mistakes they're making, however, it is understand why you would like to make to good impressionism on your audience.

To overcome this difficulty, you may try slowing down your speaking speed

Nobody will hold it against you if you speak more slowly and clearly. Grate speakers do the same to get their message across. Selecting your word carefully may also be seen as a sign of respect towards your audience. It shows that you want give them best possible answer.

GIVE YOURSELF TIME TO THINK      

  
2. GIVE YOURSELF TIME TO THINK: You may be worried that the people you're talking to are impatient and would like you to say what you want as quickly as possible.

First of all, it may not be true - people often prefer a well-though-out answer to a rushed one. So just relax.
 
LEARN SENTENCES, NOT ONLY WORDS


3. LEARN SENTENCES, NOT ONLY WORDS: In a way, this will take the pressure off too. When you learn a new word, try to memorized a couple of sentences that contain it.

There might come a time when you can use one particular sentence with little, or no alternation at all. Unfortunately, many people learn words by heart, but have no idea how to use them in a sentence .
LEARN TO LISTEN  


 4. LEARN TO LISTEN: When speaking in a fforeign language, you might be so focused on what you are saying and whether it's correct or not, that you forget to listen to what others are saying   

This is a big mistake as they might be using the exact words or grammar you'll be needing later on. So pay attention to what's being said around you, it's your most important resource at the time of speaking to someone.

 PRACTICE YOUR INTERROGATIVES
 
   
  5. PRACTICE YOUR INTERROGATIVES: We also need to keep that fact that communication is a two-way process. Not only does it make you seem uninterested - even rude -if you don' ask questions, you might also end up being the one who has to do all the talking. So when you've run out of ideas about that to say next, remember: others may have something to add.

PRODUCE

  6. PRODUCE: As i said that beginning of this article, you might know a lot about the language, but this is passive knowledge that must be activated somehow. Your aim is to able to produce correct English; practice is undeniably the best way to learn and improve.

Writing is one way of producing language: it may help you get used to and reflect on th ways English operates, which, in turn, might prove to be useful when speaking.

I hope you will find these tips useful. Feel free to ask any questions if something is not clear Remember how important it is to ask? We're here to help you...